How to Prevent Outlook from Adding Signatures
This article is for information purposes only. Consult with your IT provider beforehand. Rocketseed will not be liable for any technical support costs that arise as a result.
After installing centrally managed signature adding software such as Rocketseed, you may need to disable stamping of the messages with personal signatures created in Outlook. If you are not able to get all users to manually remove their Outlook signatures, some users may end up having two different signatures: one made by Outlooks and another added by the signature adding software operating server-side.
Solution
Users must be logged onto a domain to which you have full administrative access as they must be subjected to GPO policies for this solution to work. Organisations working with Office 365 can also apply this solution if their users are connected to an on-premises Active Directory or Azure AD to which there should be full administrative access.
To avoid the above-mentioned problem, you may use Group Policy Object. If you don’t have the ADML or ADMX file dedicated for the Outlook version used by the users, you should download one. Please pick the appropriate one from below:
Office 2007
ADML and ADMX files download page
To install this download:
- Download the file by clicking the download button and saving the file to your hard disk.
- Double-click the exe program file on your hard disk to start the Setup program.
- Follow the instruction on the screen and complete the installation.
- If you plan on using the updated Office Customization Tool (OCT), copy the entire \Admin folder into the folder that contains the installation image you are customizing.
After it has installed, use the 2007 Office system programs as you typically would.
Office 2010
ADML and ADMX files download page
To install this download:
- Download the file by clicking the download button and saving the file to your hard disk.
- To use the 32-bit version of the files, double-click the AdminTemplates_32.exe program file on your hard disk to start the Setup program.
- Follow the instructions on the screen to complete the installation.
After it has installed, use the Office 2010 applications as you typically would.
Office 2013
ADML and ADMX files download page
To install this download:
- Download the file by clicking the download button and saving the file to your hard disk.
- To use the 32-bit version of the files, double-click the admintemplates_x86_4869-1000_en-us.exe program file on your hard disk to start the Setup program.
- To use the 64-bit version of the files, double-click the admintemplates_x64_4869-1000_en-us.exe program file on your hard disk to start the Setup program.
- Follow the instructions on the screen to complete the installation.
After it has installed, use the Office 2013 applications as you typically would.
Office 2016
ADML and ADMX files download page
To install this download:
- Download the file by clicking the download button and saving the file to your hard disk.
- To use the 32-bit version of the files, double-click the admintemplates_x86_4360-100_en-us.exe program file on your hard disk to start the Setup program.
- To use the 64-bit version of the files, double-click the admintemplates_x64_4360-1000_en-us.exe program file on your hard disk to start the Setup program.
- Follow the instructions on the screen to complete the installation.
After it has installed, use the Office 2016 applications as you typically would.
On Windows Server 2008 and Newer
In order to complete this installation, both ADMX and ADML files will be needed. To install Policy Definitions on Windows Server 2008 and newer environments, all the ADMX files need to be placed inside the directory by using this command:
%SystemRoot%\PolicyDefinitions
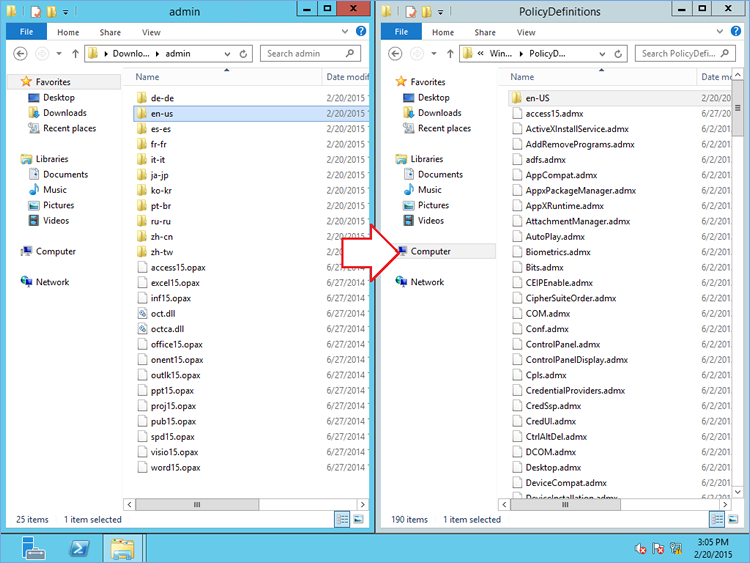
The ADML files are a part of the policy definition and must be installed along with the ADMX files. Inside the PolicyDefinition folder you will be able to see a directory with a name corresponding to your locations, e.g. en-US. Inside the downloaded package, you should find a lot of similar directories. In order to complete the installation of policies, please follow the steps below:
Ensure that you have opened the PolicyDefinitions folder and the download location
- Ensure that you have opened the PolicyDefinitions folder and the download location
- Find out what directories with language-based names are existing both in PolicyDefinitions and in the download location
- In the download location, copy the folders whose names are also found in PolicyDefinitions.
- Paste the copied folders into the PolicyDefinitions folder.
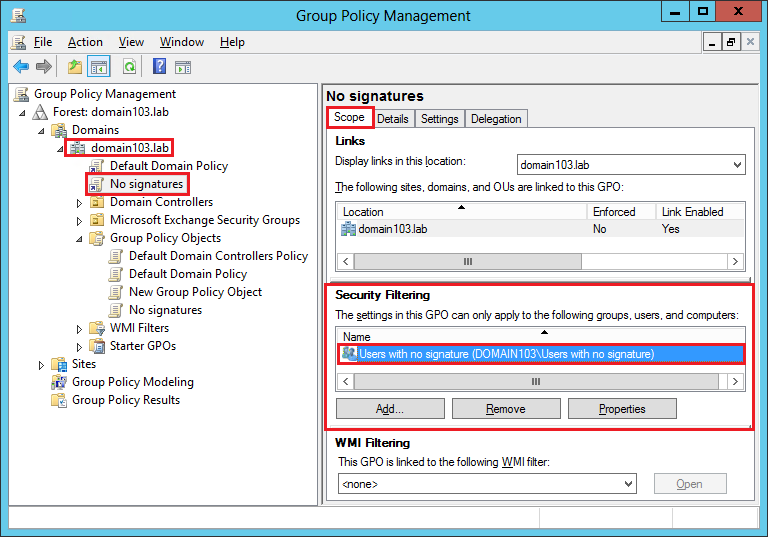
Before this step, please ensure that you have a relevant Security Group containing all users who should not receive any signatures added by Microsoft Outlook. Open the Group Policy Management Edior by running gpmc.msc and follow the steps described below:
- In the left pane, right-click on your domain e.g. domain03.lab then select Create a GPO in this domain, and Link it here.
- Name your new GPO e.g. ‘No signatures’ and click OK.
- Select the newly created object to open it.
- In the Scope tab, remove Authenticated Users from the Security Filtering pane.
- In the same pane, add the Security Group that you created earlier e.g. Users with no signature
Finally, right-click on GPO in the right pane and select Edit from the context menu. In the window which appears, navigate to User Configuration, Policies, Administrative Templates (or Classic Administrative Templates), Microsoft Outlook 2010 and Outlook Options then Mail Format.
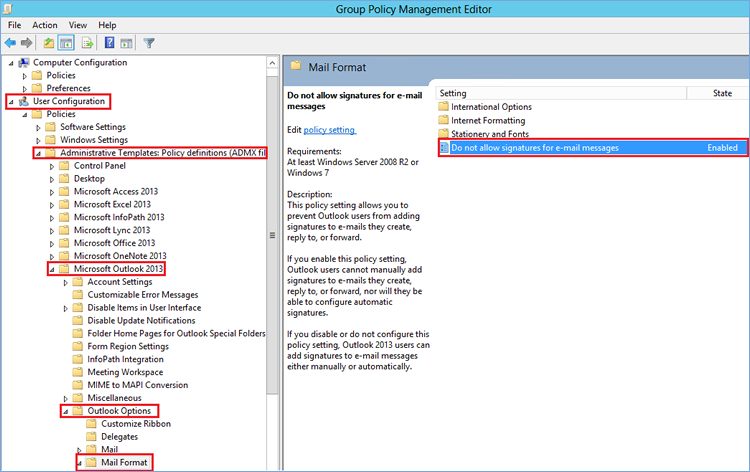
In the right pane you will see the ‘Do not allow signatures for email messages’ option, enable this option.
All users have to log out and then log in to apply the changes. Moreover, the policy update can be manually forced by running gpupdate /force. These changes do not take effect immediately because the time of this process depends on every specific environment configuration.
On Windows Server 2003 or SBS2003
- Open Active Directory Users and Computers.
- Prior to taking the next steps, please ensure that you have a relevant Security Group containing all users who should not receive any signatures created by Microsoft Outlook. If so, right-click on your domain.
- Choose the Properties, Group Policy tab and click the Open button. The Group Policy Management console should appear.
- Right-click on your domain (e.g. sbs2003.local) and from the context menu select the command Create and Link a GPO Here…
- Name your new Group Policy Object.
- Select the newly created GPO in the left pane and ensure, that you have opened the Scope
- In the Security Filtering pane add the Security Group you prepared earlier and then remove Authenticated Users from the list.
- Once it is done, right click on your GPO in the left pane and select Edit…
Group Policy Object Editor should show up. Once it does, expand Administrative Templates. To install the previously downloaded policies’ definitions, right-click on Administrative Templates and select Add/Remove Templates. The following window will appear:
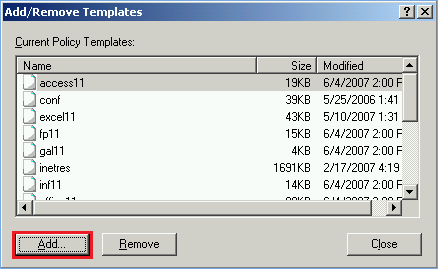
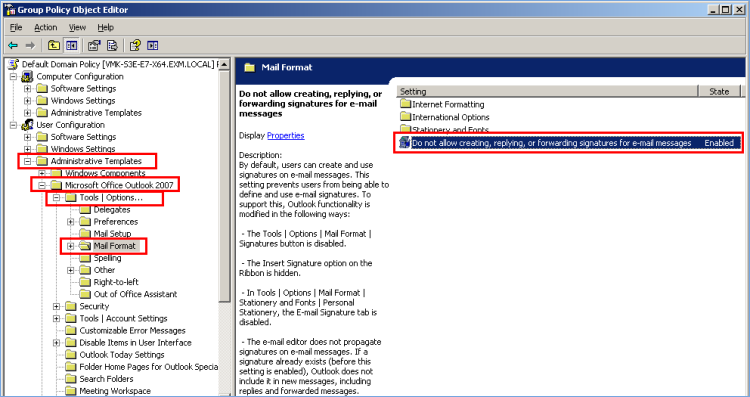
Click the Add… button and select the ADM files, then click Close. Now you are able to set proper policies to remove current signatures in Microsoft Outlook. To do so, please expand the Administrative Templates and select Microsoft Office Outlook XXXX (where the XXXX stands for the version of the installed Office templates). In the figures below you can see where the relevant policies are located in Office 2003 and Office 2007.
Disabling signatures added by Outlook 2007, using Exchange Server:
Disabling signatures added by Outlook 2003, using Exchange Server:
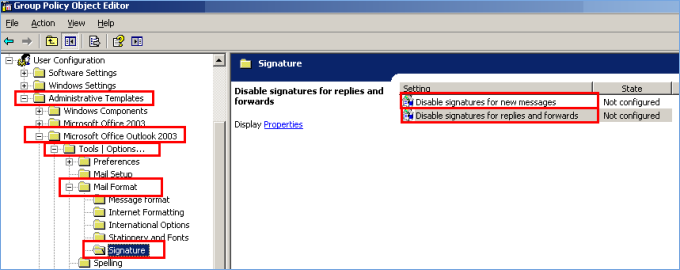
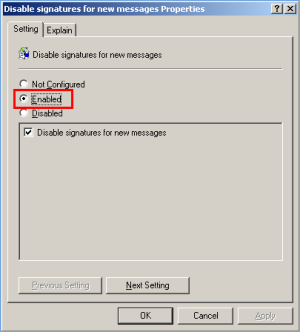
To disable adding the Outlook signatures to messages, set the tools marked in the pictures above to Enabled. Additionally, for Outlook 2003, check the two disabling boxes (Disable signatures for new messages / Disable signatures for replies and forwards)
All users have to log out and then log in to apply the changes. Moreover, you can manually force the policy update by running gpupdate /force. Please keep in mind that these changes will not take effect immediately, because the time of this process depends on your specific environment configuration.


